

Victorine Njong
November 01, 2026
Preparing Your Home for Aging in Place: A Room-by-Room Plan
Last Updated: October 31, 2026
Quick Summary
Preparing your home for aging in place starts with a room-by-room home assessment that measures doorways, steps, thresholds, and lighting before you buy anything. Then sequence fixes by urgency: bathroom grab bars and non-slip surfaces first, handrails on both sides of stairs, clear paths, and step-free entry access.
- Measure doorway clear width, step height, and threshold height to replace impressions with facts contractors can bid from.
- Install grab bars in the shower, beside the toilet, and near the sink, anchored into studs, not drywall.
- Handrails on both sides of every staircase are the single best stair upgrade.
- Keep everyday kitchen items between waist and shoulder height and swap knobs for lever handles.
- Reassess the home every six to twelve months or after any change in health, medication, or mobility.
Table of Contents
- Start With an Aging in Place Home Assessment Before You Buy Anything
- Entrances, Exits, and Step-Free Access
- Bathroom Safety: Grab Bars, Non-Slip Surfaces, and Lighting
- Kitchen, Bedroom, and Hallway Fixes That Prevent Falls
- Your Aging in Place Home Safety Checklist, Room by Room
- Aging in Place Home Modifications Worth the Money, and What to Skip
- Use the Room-by-Room Aging in Place Checklist to Sequence Your Projects
- When Home Modifications Are Not Enough: Planning the Next Step
- Frequently Asked Questions
Start With an Aging in Place Home Assessment Before You Buy Anything
Preparing your home for aging in place starts with one honest walk-through, not a shopping cart. An aging in place home assessment is a room-by-room review of how your house supports safety, mobility, and daily tasks today, and where it will fall short as needs change.
Families often buy ramps or shower chairs before knowing what the house needs. Assess first, then buy, and record findings so they hold up with contractors and insurers.
Walk the House With a Critical Eye
Move through each room the way a tired person at night would. Ask four questions:
- Can someone get through this doorway with a walker or wheelchair?
- Is there anything to hold onto along the path?
- Could a loose rug, cord, or step cause a trip?
Don’t judge from memory. Walk it in dim light, in slippers, at a slow pace. Bring a tape measure and notepad, vague notes like “doorway feels narrow” are hard to act on.
Measure the Numbers That Actually Matter
Contractors and occupational therapists assess by dimension, not feel. Recording key measurements turns your walk-through into a document you can hand to a professional and use for accurate bids.
Measure and note:
- Doorway clear width. Measure the narrowest point with the door open. Measure the clear width carefully, since standard interior doors can be narrower than they appear once the slab and stop are counted.
- Hallway width. Note the narrowest pinch point; turning a wheelchair or walker needs more room than moving straight through.
- Step height and count. Measure the rise of each exterior and interior step; taller, uneven steps are harder than a uniform flight.
You don’t need every number perfect. The point is replacing impressions with facts, because facts are what contractors quote from and what insurers and funding programs ask for.
When to Bring In an Occupational Therapist
An occupational therapist, or OT, can spot hazards most families miss.
Ask your doctor for a referral, or check whether your insurer covers a home safety visit. Some area agencies on aging and local nonprofits also offer low-cost or free home safety visits, the Eldercare Locator can point you to local programs.
A professional assessment is worth the effort when:
- The person has had a fall or a near-fall in the past year.
- Mobility has changed recently, a new walker, cane, or wheelchair.
- Vision or hearing loss is affecting daily routines.
For general guidance on home safety for older adults, the CDC’s home fall prevention resources outline the main risk factors.
Check Code and Installation Requirements Before You Buy
Some modifications are simple swaps; others need a permit, an electrician, or a qualified contractor. Knowing which is which before you shop can save money and prevent unsafe installs.
- Grab bars must be anchored into wall studs or blocking, not drywall alone. A bar that pulls loose under a fall is worse than no bar.
- Ramps have slope limits; too steep is dangerous in rain, snow, or with a wheelchair. Have the slope checked against local building requirements and confirm whether a permit is required.
- Stairlifts and platform lifts typically require professional installation and may need electrical work and permits.
When in doubt, call your local building department and ask. It is a free question that prevents an expensive mistake.
Pro Tip
Photograph each problem area and keep your measurements with the photos. A contractor can bid from photos and dimensions far more accurately than from a verbal description, and you will have a record if you apply for funding later.
Photograph each problem area and keep your measurements with the photos. A contractor can bid from photos and dimensions far more accurately than from a verbal description, and you will have a record if you apply for funding later.
Entrances, Exits, and Step-Free Access
Step-free access is the first upgrade most homes need. If a walker or wheelchair cannot get in the front door, nothing inside matters yet.
Start with the main entry your family actually uses. Look at:
- Steps: Can they be replaced with a gentle slope or a zero-step entry?
- Doorway width: Is there room for a wheelchair to pass?
- Thresholds: Are there raised lips that catch a walker wheel?
A zero-step entry costs more than a ramp but works better long term. Ramps work fine when the rise is small and the slope stays gentle; a steep ramp becomes dangerous in rain or snow, so have the slope checked before installing one.
Bathroom Safety: Grab Bars, Non-Slip Surfaces, and Lighting
The bathroom causes more falls than any other room.
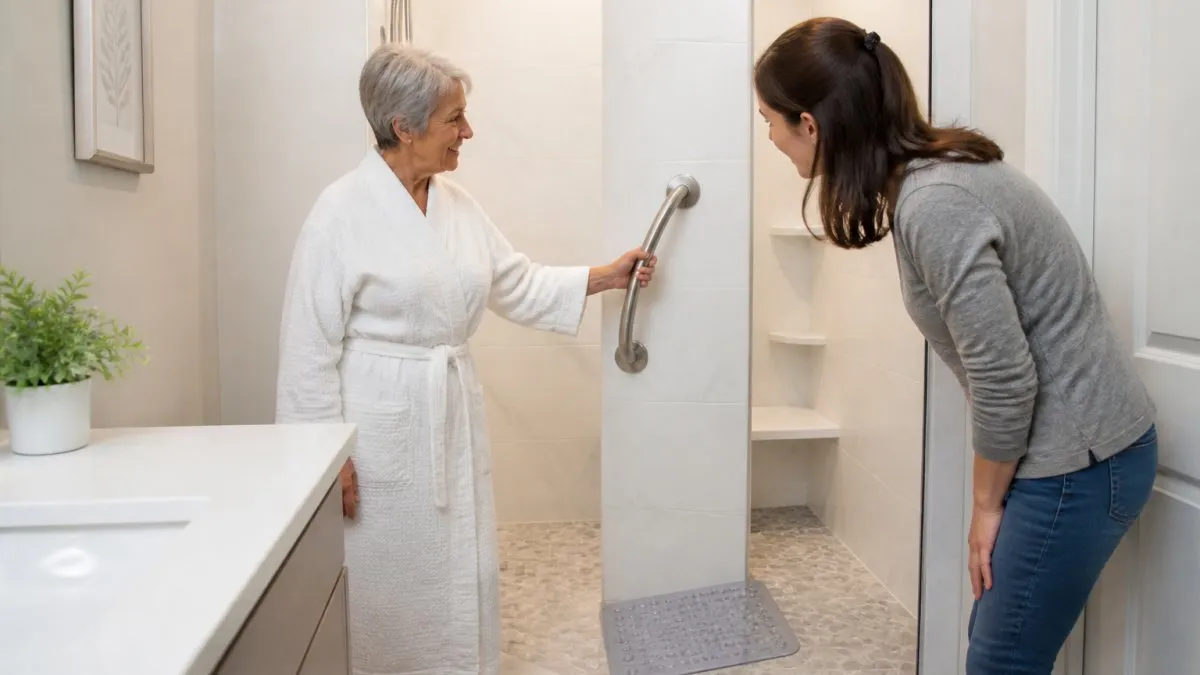
Install grab bars in the shower, beside the toilet, and near the sink, anchored into studs, not drywall.
Add a non-slip mat inside the tub or shower, and consider a shower chair and hand-held sprayer.
Lighting matters more than most people think. Fading vision needs brighter, even light with no dark corners.
Kitchen, Bedroom, and Hallway Fixes That Prevent Falls
Fall prevention in the kitchen, bedroom, and hallways comes down to reach, grip, and clear paths. Small changes here prevent most household tumbles.
Kitchen Accessibility
Keep everyday items between waist and shoulder height. Move heavy pots and dishes to easy shelves. Add a sturdy step stool only if balance is strong; skip it otherwise.
Lever-style faucets and D-shaped cabinet pulls are easier on arthritic hands than knobs. Good task lighting over the counter reduces mistakes with knives and hot pans.
Bedroom Access and Comfort
A firm mattress set at a height that lets feet touch the floor makes getting up safer. Add a bedside lamp within arm’s reach and a night light along the path to the bathroom.
Clear the floor of shoes, cords, and clutter. Keep a phone or medical alert device on the nightstand.
Stairs, Handrails, and Clear Pathways
Handrails on both sides of every staircase are the single best stair upgrade.
Keep hallways clear and well lit. Remove loose rugs or tape them down with double-sided grip tape. Fix loose floorboards and worn carpet edges.
For more on home modification standards, the AARP home safety guidance covers many of these same fixes.
Your Aging in Place Home Safety Checklist, Room by Room
An aging in place home safety checklist turns your walk-through into a plan. Use this one to record what you find in each room.
| Room | What to Check | Fix if Needed |
|---|---|---|
| Entry | Steps, thresholds, lighting | Ramp or zero-step entry, brighter lights |
| Bathroom | Grab bars, non-slip mat, toilet height | Install anchored bars, add riser |
| Kitchen | Reach, knobs, task lighting | Move items lower, swap to levers |
| Bedroom | Bed height, night light, clear floor | Adjust bed, add lamp, clear clutter |
| Hallways | Rugs, cords, lighting | Tape or remove rugs, add lights |
| Stairs | Handrails, step edges | Add rails both sides, contrast tape |
| Outdoor | Walkways, steps, lighting | Repair cracks, add path lights |
Print this list and take it with you on your next walk-through. It works as a room-by-room aging in place checklist you can update as needs change.
Aging in Place Home Modifications Worth the Money, and What to Skip
Some aging in place home modifications pay off immediately; others cost a lot and help little. The difference comes down to urgency, whether the fix is a simple swap or a construction project, and who is paying. Here’s how we rank them, with a phased plan you can budget around.
Tier 1: Low-Cost, High-Impact Fixes to Do First
These are the changes most practitioners recommend starting with. They are inexpensive relative to remodels, often DIY-friendly, and address the most common fall risks.
- Grab bars in the shower, beside the toilet, and near the sink. Anchored into studs, not drywall.
- Non-slip mats inside the tub or shower and on smooth bathroom floors.
- Night lights on the path from bed to bathroom and along hallways.
Most of these can be done in a weekend. Grab bars and lever swaps require basic tools and, for grab bars, a stud finder and willingness to drill into tile or drywall.
Tier 2: Moderate-Cost Fixes That Need a Contractor or Electrician
These cost more and usually need a professional, but they deliver large safety gains.
- Handrails on both sides of every staircase. The single best stair upgrade.
- Better lighting throughout, brighter fixtures, added switches at room entries, motion-sensor lights in hallways and bathrooms. Electrical work generally needs a licensed electrician and a permit.
- A ramp or zero-step entry at the main door your family uses. A zero-step entry costs more than a ramp but works better long term; have the slope checked against local requirements before installing.
Get at least two bids for anything in this tier, and ask each contractor whether a permit is required. A bid that skips the permit is a red flag.
Tier 3: Higher-Cost Changes to Delay Until You Have Lived With the Smaller Fixes
These can be right answers, but they are expensive and often solve a problem the cheaper fixes already addressed.
- Full bathroom remodels before simpler fixes are tried.
- Stairlifts when a downstairs bedroom could work instead.
- Wide-open floor plan changes that cost more than they return in safety.
Live with the Tier 1 and Tier 2 changes for a few weeks. You will learn which problems are actually solved and which remain, and you will avoid paying for a remodel you did not need.
How to Sequence the Work
Sequence projects by urgency, not by wish list. Start with the fixes that prevent the most dangerous falls.
- Fix the bathroom first. Grab bars, non-slip mat, better lighting.
- Secure the stairs. Handrails on both sides, contrast tape on edges.
- Clear the paths. Remove or tape rugs, fix cords, brighten hallways.
- Improve the entry. Ramp or zero-step access, better outdoor lighting.
- Adjust the kitchen and bedroom. Reachable storage, bed height, night lights.
- Add smart-home tools. Medical alert device, automatic lights, stove shut-off.
Do the cheap, high-impact items first. Save the bigger remodels for after you have lived with the smaller changes for a few weeks.
Funding, Insurance, and Tax Considerations
Cost is the barrier families mention most often, and the help that exists is scattered across several programs. Here is where to look. For help planning finances for senior care, see our financial planning resources.
- Medicare and Medicare Advantage. Original Medicare generally does not cover home modifications, but some Medicare Advantage plans include in-home safety assessments or limited modification benefits. Confirm with your plan before scheduling.
- Medicaid waivers. Some states operate Home and Community-Based Services waivers that may pay for home modifications for eligible people. Eligibility and covered items vary by state; your local Area Agency on Aging can explain what is available where you live.
- Area Agencies on Aging. These local agencies connect families to services and funding programs, including some home modification assistance. The Eldercare Locator finds the one nearest you.
Watch Out
Funding programs change and eligibility rules vary by state and by program. Confirm current details directly with the program before you budget around them. Do not pay a contractor in full before work is complete and inspected.
Funding programs change and eligibility rules vary by state and by program. Confirm current details directly with the program before you budget around them. Do not pay a contractor in full before work is complete and inspected.
Reassess Every Six to Twelve Months
A home that works today may not work after a change in health, medication, or mobility. Reassess every six to twelve months, or after any such change, and update your checklist. The phased plan is meant to be revisited, not finished once.
Use the Room-by-Room Aging in Place Checklist to Sequence Your Projects
Sequence projects by urgency, not by wish list. Start with the fixes that prevent the most dangerous falls.
- Fix the bathroom first. Grab bars, non-slip mat, better lighting.
- Secure the stairs. Handrails on both sides, contrast tape on edges.
- Clear the paths. Remove or tape rugs, fix cords, brighten hallways.
- Improve the entry. Ramp or zero-step access, better outdoor lighting.
- Adjust the kitchen and bedroom. Reachable storage, bed height, night lights.
- Add smart-home tools. Medical alert device, automatic lights, stove shut-off.
Do the cheap, high-impact items first. Save the bigger remodels for after you have lived with the smaller changes for a few weeks.
When Home Modifications Are Not Enough: Planning the Next Step
Sometimes the house cannot be made safe enough, no matter how much you modify. If wandering, confusion, or round-the-clock care needs have arrived, it may be time to look at a residential setting.
You do not have to figure this out alone. Start by scheduling a tour to see what a small, home-like community feels like. If cost is the worry, our guide to residential assisted living pricing breaks down what you are paying for. Families comparing local options can review assisted living in Katy for costs, care details, and tour tips. And if memory care is the next step, our memory care transition guide walks you through it.
At Providence Assisted Living Solutions, our community is intimate and family-style, with a small number of residents, a high staff-to-resident ratio, chef-prepared meals, and personalized care plans.
Frequently Asked Questions
How do I prepare my home for aging in place?
Begin with an aging in place home assessment that walks every room for fall risks, then fix the highest-risk items first: bathroom grab bars, handrails on both sides of stairs, better lighting, and removing loose rugs. Add a zero-step entry or ramp if steps block the main door. Work room by room rather than all at once, and reassess every year or after any change in health, mobility, or vision.
What should be included in an aging in place home safety checklist?
A solid aging in place home safety checklist covers entrances and exits, bathrooms, kitchen, bedroom, hallways and stairs, lighting, and flooring. For each area, note trip hazards, grab bar placement, reachable storage, switch and outlet access, and whether pathways stay clear. Include outdoor safety too: well-lit pathways, sturdy railings, and even surfaces. Keep the list and update it after each project so you can see what is done and what remains.
Which home improvements should I make first for aging in place?
Rank projects by urgency, budget, and whether you can do them yourself. Bathroom fall prevention comes first because it is where slips are most common: grab bars, non-slip surfaces, and a shower seat. Next are stairs and hallways with secure handrails and clear pathways, then lighting and trip-hazard removal. Larger projects like zero-step entries or open floor plan changes can follow once the low-cost safety basics are in place.
Should I hire a professional to assess my home for aging in place?
An occupational therapist or aging-in-place specialist can spot issues families miss, especially for fading vision, balance changes, or early cognitive decline. A professional assessment is worth it if your parent has had a fall, uses a walker or wheelchair, or has dementia. For general home safety, a careful family walkthrough with a written checklist covers most basics. Either way, reassess periodically as needs change.
If you are weighing whether to keep modifying the house or start planning a move, that decision deserves a real conversation, not a rushed one. Providence Assisted Living Solutions offers 24/7 care and supervision in a true residential setting, with personalized care plans and attentive wellness monitoring that give families peace of mind. Get started with Providence Assisted Living Solutions and see what a smaller, home-like community can offer your family.

Recent Post

Big News! Providence Assisted Living Solutions
State Long-Term Care Ombudsman Program
May 12, 2026

Our Friendly Staff
May 27, 2026